martes, 9 de junio de 2015
lunes, 8 de junio de 2015
Creating Revit Curtain Wall Mullion ProfilesimagePosted by Dwane Lindsey
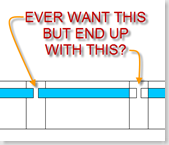
Have you ever wondered how to get a Curtain Wall Mullion to display like the adjacent image? I've had a few people ask how to accomplish this and it's really quite easy to do.
The first thing is selecting the correct family template for the profile that you want to make, which for Curtain Wall Mullions is Profile-Mullion.rft. When you start with this template, it has some text that helps you figure out where to draw the profile.

As you can see in the image to the left, I've noted basically what the above mentioned template says...Curtain Panels are trimmed to where the profile sketch intersects the Center (Front/Back) Ref Plane.
So instead of placing the profile like the previous image, place the Panel portion of the mullion centered on the reference plane, it will break the panel at with that width instead of the overall width of the mullion.
Remember, the insertion point of the profile is where the two reference place intersect, so you'll have to utilize the Offset Parameter in the Type Properties to get the mullion in the correct location. Also, don't forget to throw in some parameters of your own to the profile to create different types (sizes)...whether it's panel thickness, width, depth, etc.
domingo, 7 de junio de 2015
Hanselmann House Michael Graves
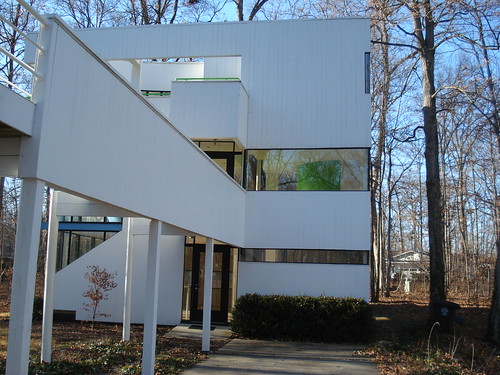
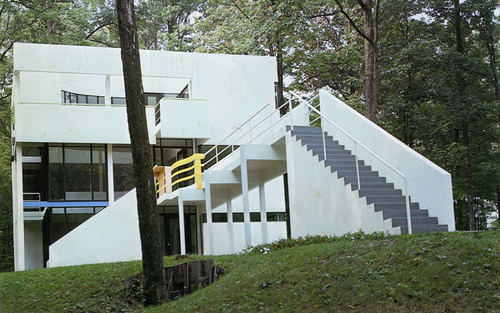
Hanselmann House
La casa fue construida en 1967.
El estilo de su construcción es postmodernista, retomando la tradición de la geometría abstracta de Le Corbusier pero con un lente postmodernista.
Tienes 268 metros cuadrados.
La casa fue la primera comisión de Michael Graves, y el cliente fue su amigo de la preparatoria y su esposa,
Jay y Lois Hanselmann.
está ubicada en 10220 Circlewood Dr en Fort Wayne, Indiana, en los Estados Unidos de América.
Vistas exteriores
Interiores
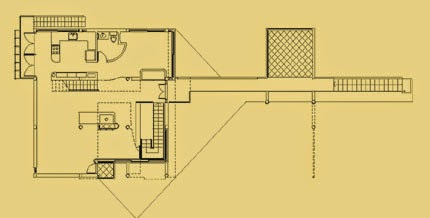
Plantas y elevaciones y corte
Casa Benacerraf - Michael Graves
Casa Benacerraf - Michael Graves


Diseñador y arquitecto estadounidense, nacido en Indianápolis, Indiana. Se formó en las universidades de Cincinnati y Harvard. Su capacidad innata para dibujar y pintar se convirtió en la base sobre la que desarrolló su talento arquitectónico. Después de realizar sus estudios de posgrado en Harvard, 1959, obtuvo una beca en la academia de los Estados Unidos en Roma. Al profundizar en la arquitectura y pintura clásicas modificó sus puntos de vista a la hora de proyectar. En 1962, Graves volvió a su país para ser lector en arquitectura por la universidad de Princeton. Más tarde fue profesor asistente y asociado hasta llegar a ser titular en 1972. Graves discutió con otros jóvenes arquitectos sobre la naturaleza de la arquitectura y su relación con el medio ambiente y los problemas urbanos. Trabajó con Peter Eisenmann en el New Jersey Corridor Study, una ciudad imaginaria que se extendería desde Nueva York hasta Filadelfia. Graves y Eisenmann tomaron parte en importantes exposiciones en Nueva York, y en 1972 se asociaron con otros tres prometedores arquitectos, llamándose los five. El libro donde resumían la primacía de la forma sobre la tecnología se convirtió en el foco del debate arquitectónico contemporáneo. Graves ha diseñado murales, carteles, alfombras, vestidos, menaje y muebles, además de casas, galerías de arte y edificios a gran escala. Se ha inspirado en la arquitectura mediterránea y en los modelos clásicos, mezclándolos con la influencia de los maestros contemporáneos. Entre sus más importantes obras, destacan el edificio Portland, en Oregón, terminado en 1982; la biblioteca regional San Juan Capistrano en California, dentro de un estilo colonial español y el edificio Humana, en Louisville, Kentucky, un rascacielos en granito rosa. Uno de sus principales encargos fue la ampliación del museo Whitney, en Nueva York, durante la década de 1980. Sus dos primeros bocetos provocaron demasiada polémica, pero su tercera propuesta preservó la esencia de la construcción en granito gris que hizo el arquitecto húngaro Marcel Breuer, y la combinó con su particular punto de vista. Entre sus últimas creaciones, está su ecléctico hotel y recinto para convenciones, en el centro Walt Disney World Epcot, en Florida
jueves, 4 de junio de 2015
Vray To Mental ray
Cortesy OF:
http://jamiecardoso-mentalray.blogspot.com/2010/01/mental-rayconverting-vray-max-scene-to.html
In production/Architecture/3D visualisation companies, it is very common for users to inherit/acquire 3D scenes with incompatible rendering engines and shaders/bitmaps.
The majority of these 3D scenes come in VRay (i.e. Archmodels; Turbosquid; etc). Due to the amount of geometry/3D scenes that one may require converting, it is often commendable to use script/s to speed up this otherwise tedious and time consuming process.
The following steps will help you fast track the above process:
1-One needs to have a version of vray (i.e. even a Demo version would be ok) compatible with your version of Max, already installed. It is highly advisable to work in a separate Max scene to the main one, to prevent merging any possible bugs; missing bitmaps; etc.
Once the conversion/s is/are completed and "stress tested” for errors, then it is safe to merge it/them into one's main scene.
2 –Open your Vray Max scene and run the script as described in The Book.


3-Now that the scene had been converted to mental ray; you need to load the mental ray renderer. Some of the original Vray material slots may become empty during the conversion. Open the "material/map browser" dialog to view all materials in the scene. Select a slot in the material editor. Back on the "material/map browser" dialog, double click on any of the newly converted mr materials to load it in the material editor. Repeat the action with all relevant materials from the "material/map browser" dialog.


4-When converting the scene from Vray to mental ray, the script tries to maintain the integrity of each material (i.e. glossy levels, bitmaps, values, etc) however, certain materials may still require some attention:
Prior to moving bitmaps and/or changing mental ray presets, one should make a copy of the relevant slot/s for reference purposes(i.e. drag and drop it onto another slot).
This is mainly in case one requires copying and pasting settings/bitmaps from the reference copy onto the new preset.

Vray reads opacity as white and mental ray reads it as black. As result one may require inverting colours in order for mental ray to read them accurately.
To do this, simply check/enable the "invert" function, on the bitmap "output" parameters".
The opacity bitmaps require moving to the "cutout" toggle, under the "special purpose map" parameters.

Since there are mental ray preset shaders for most real world materials, you may wish to apply these physically accurate template shaders to some of these newly converted materials.
Some of the most popular templates used are: Metal materials (i.e. chrome, brushed metal etc); Glass (i.e. glass thin geometry; glass solid geometry for thick glass and glass physical for goblets, champagne flutes etc); glossy plastic; water; masonry and promaterial shaders.
Some of these new templates may have the diffuse colour values very low; simply increase it to 1.0.
Also the colour "diffuse" toggle may be disabled by default; simply scroll down to the general maps parameters and check the "diffuse" color toggle to enable it.


Also, increase the "fast glossy interpolation" value preset as explained in our book.
To clear all unused Vray materials in the scene, simply click the "utilities" menu from the material editor.
On the dropdown list, choose the condense material editor slots function.
To be on the safe side,some users also choose the "reset material editor slots" utility thereafter.
Finally, in the material editor, one can reload the shaders being used in the scene as described earlier; test render the scene for any possible errors and merge it/them into your main scene.

http://jamiecardoso-mentalray.blogspot.com/2010/01/mental-rayconverting-vray-max-scene-to.html
In production/Architecture/3D visualisation companies, it is very common for users to inherit/acquire 3D scenes with incompatible rendering engines and shaders/bitmaps.
The majority of these 3D scenes come in VRay (i.e. Archmodels; Turbosquid; etc). Due to the amount of geometry/3D scenes that one may require converting, it is often commendable to use script/s to speed up this otherwise tedious and time consuming process.
The following steps will help you fast track the above process:
1-One needs to have a version of vray (i.e. even a Demo version would be ok) compatible with your version of Max, already installed. It is highly advisable to work in a separate Max scene to the main one, to prevent merging any possible bugs; missing bitmaps; etc.
Once the conversion/s is/are completed and "stress tested” for errors, then it is safe to merge it/them into one's main scene.
2 –Open your Vray Max scene and run the script as described in The Book.


3-Now that the scene had been converted to mental ray; you need to load the mental ray renderer. Some of the original Vray material slots may become empty during the conversion. Open the "material/map browser" dialog to view all materials in the scene. Select a slot in the material editor. Back on the "material/map browser" dialog, double click on any of the newly converted mr materials to load it in the material editor. Repeat the action with all relevant materials from the "material/map browser" dialog.


4-When converting the scene from Vray to mental ray, the script tries to maintain the integrity of each material (i.e. glossy levels, bitmaps, values, etc) however, certain materials may still require some attention:
Prior to moving bitmaps and/or changing mental ray presets, one should make a copy of the relevant slot/s for reference purposes(i.e. drag and drop it onto another slot).
This is mainly in case one requires copying and pasting settings/bitmaps from the reference copy onto the new preset.

Vray reads opacity as white and mental ray reads it as black. As result one may require inverting colours in order for mental ray to read them accurately.
To do this, simply check/enable the "invert" function, on the bitmap "output" parameters".
The opacity bitmaps require moving to the "cutout" toggle, under the "special purpose map" parameters.

Since there are mental ray preset shaders for most real world materials, you may wish to apply these physically accurate template shaders to some of these newly converted materials.
Some of the most popular templates used are: Metal materials (i.e. chrome, brushed metal etc); Glass (i.e. glass thin geometry; glass solid geometry for thick glass and glass physical for goblets, champagne flutes etc); glossy plastic; water; masonry and promaterial shaders.
Some of these new templates may have the diffuse colour values very low; simply increase it to 1.0.
Also the colour "diffuse" toggle may be disabled by default; simply scroll down to the general maps parameters and check the "diffuse" color toggle to enable it.


Also, increase the "fast glossy interpolation" value preset as explained in our book.
To clear all unused Vray materials in the scene, simply click the "utilities" menu from the material editor.
On the dropdown list, choose the condense material editor slots function.
To be on the safe side,some users also choose the "reset material editor slots" utility thereafter.
Finally, in the material editor, one can reload the shaders being used in the scene as described earlier; test render the scene for any possible errors and merge it/them into your main scene.

Suscribirse a:
Entradas (Atom)


